Sewing Room Makeover

You guys. Being pregnant has knocked me off my creative groove. Mostly because I am so tired all the time!!! Things are looking up though, I am feeling much better! Therefore I am trying to get a few projects done before I become a whale. Lets start off with my mom's sewing room.

My mom has been a seamstress for over 30 years. That is a lot of years to accumulate a lot of STUFF. And in the last 10 years she has gotten into quilting which is a whole other ball game. While she was raising 7 kids in the house she got what could be termed a "Harry Potter closet" for her sewing room, which she shared with the laundry room. How did she do it?!?! So now that 6/7 of the kids are gone there are a few extra rooms in the house. Welcome to the "Sewing Room" -- insert chorus of angels here -- She has waited a long time for this. However it is in dire need of a makeover...

BEFORES


We spent probably 1.5 days just sitting and dejunking. Thank goodness for the hormonal pregnant woman (aka me) who had no sympathy and made Julie part with her beloved fabrics and notions and... things. We got rid of a lot, which was the KEY to making this sewing room functional.


AFTERS
Thank you Real Deals for the perfect metal basket shelf. We needed some major STORAGE!

Everything has a place. It's the most beautiful part. 

We hung the rulers on the side of the sewing table - genius!

That dresser though?! <3 so beautiful. And it is FULL of projects for Mom to finally make! You would not believe all the treasures we dug out of this sewing room! 
"oh I remember when I bought this!" 
"oh so CUTE! I forgot I had this!!!"

I REALLY wish we had a picture of this closet beforehand. It was so over-flowing full that it wouldn't even close...


Chalk Paint + Distressing Furniture

Are you guys ready to see some serious makeovers?? 

This is only my 2nd time using chalk paint, so I was a little nervous. I just took the plunge and I'm so happy with the results!! My mother in law, Cindy, just moved into a new house and was hoping for a bedroom makeover (umm I am ALL over this). We used all of her existing furniture and totally transformed the look of her room. I enlisted the help of my sisters-in-law who are WAY better at home decor than myself. I couldn't have done it without them.

Cindy really loves that warm teal/blue color that has been floating around.  She already had a black and white bedspread so we decided to use what she already had! This was going to be one cute black/white/teal bedroom.

BEFORES
The furniture was not real wood, but you would never know! The chalk paint didn't mind either :)


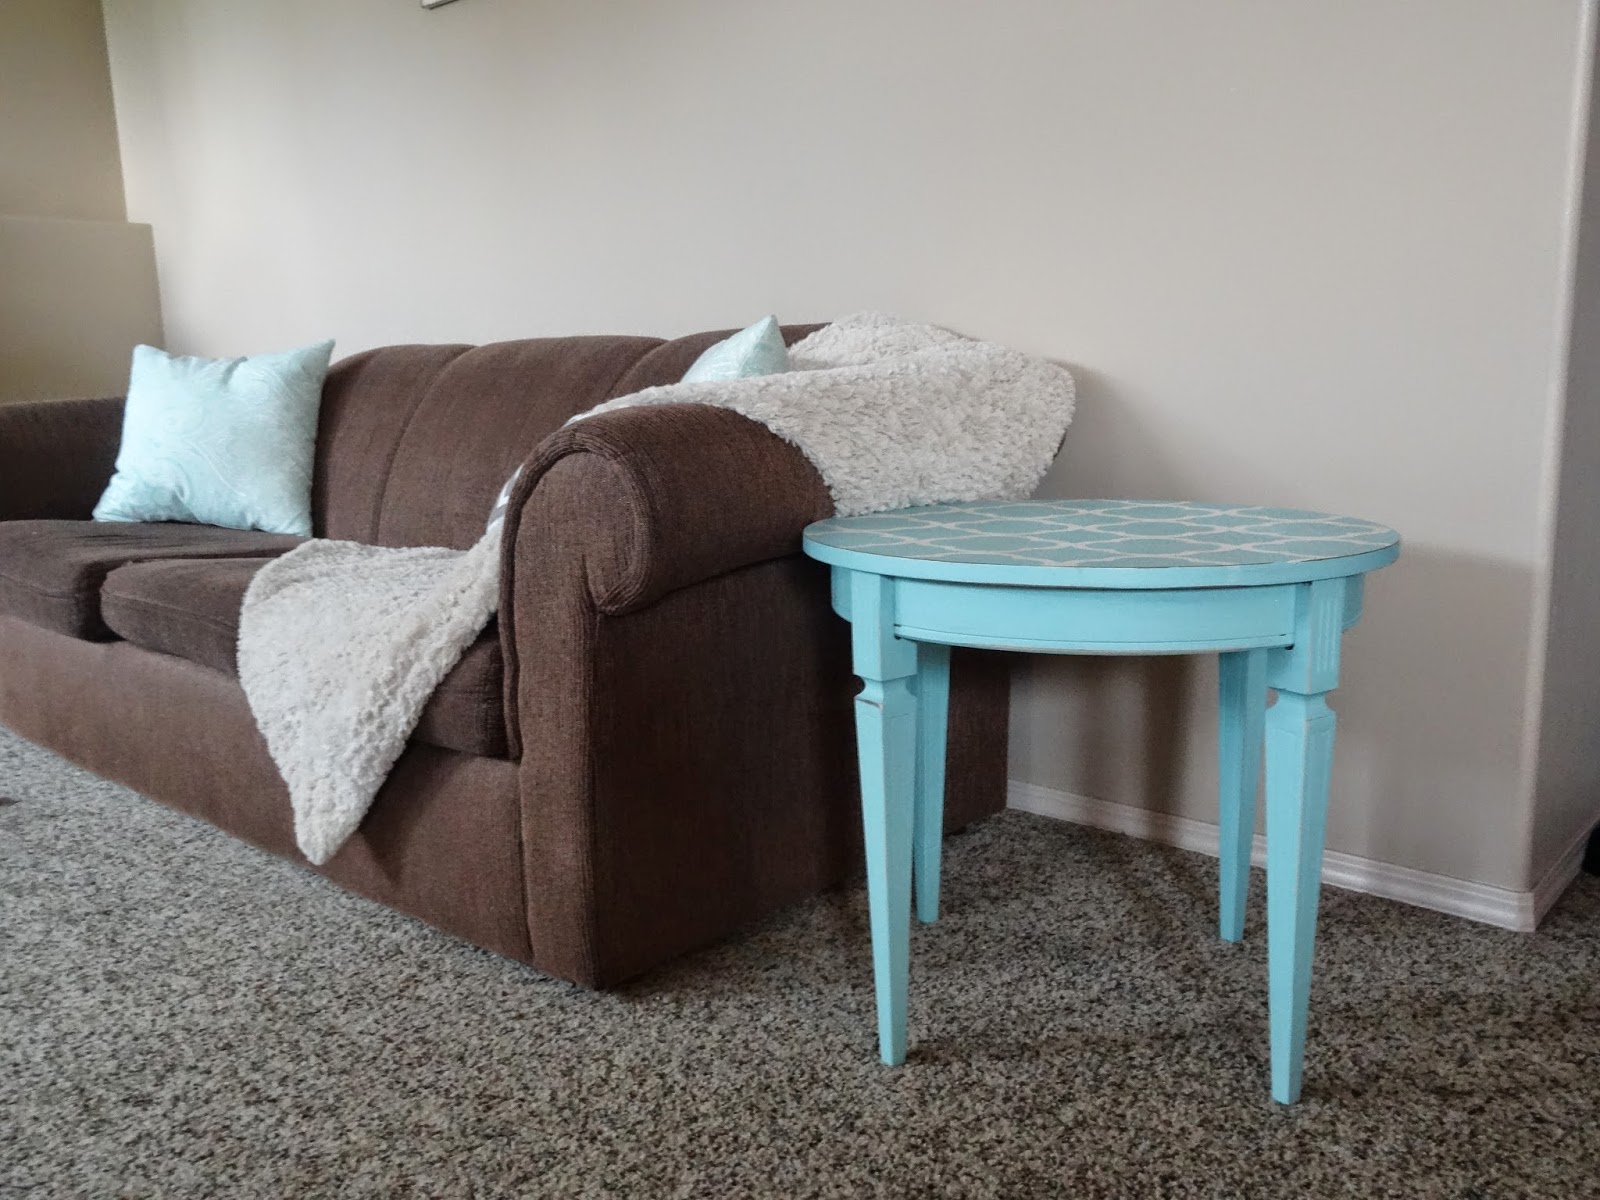
Forgot to take a before picture of this one before I started painting. It was a white end table - pretty banged up. Needing some TLC

I couldn't decide if I should paint all of the furniture the same color or if that would be too overwhelming in the room.  My sisters-in-law agreed that it was a bedroom set and with all the black and white we were going to use in the room it wouldn't be too much.

I used Benjamin Moore Vintage Revivals chalk paint called "waterfall". The beauty about Benjamin Moore's chalk paint is that you can mix ANY one of their colors into chalk paint. The sky is the limit!

STEPS
1. Clean the furniture really well before painting
2. No sanding or priming required, just paint!
3. Distress furniture slightly with sandpaper
4. Add protective coat

Paint is drying


Once 2 coats have dried I decided to do a little distressing

I took an 80 grit sandpaper and 220 grit sandpaper to do the distressing. The higher the number on the sandpaper the more fine it is and the lower the number the more rough it is (obviously haha). 80 is a very rough sandpaper so thats what I used for the majority of the distressing.

Fresh paint about to get mangled!!

I try to distress only on areas that would naturally get wear and tear, (mostly on the edges and corners of the furniture). It's a pretty simple process you just kind scratch off the paint and let the natural dark wood show through. You can't go wrong, I promise!


No distressing

Slight distressing

TOP COAT
Rule of thumb for a top coat is that if you're covering a light color paint you want to use a WATER based protective coat because it stays true to the original color, I usually use Minwax Polycrylic. An OIL based protective coat (Polyurethane) gives the furniture a slight yellowing. Even though I used a light color and a polycrylic would have been appropriate I went with what I already had at home which was a polyurethane. I figured it would make the color a little warmer and would compliment the distressing I would be doing by making the color a little more vintage. 

You can see how the polyurethane made the color a little warmer and not quite so knock-your-socks-off blue.


I sprayed the original handles with my FAVORITE spray paint. This stuff is a dream, no drips, and perfectly even coverage


Put the headboard up, now just looking for some perfect pillows <3 And some cute pictures in the frames obvi

I added some cute black flower knobs at Home Hardware to tie in the black and white theme with the nightstand. Technically the nightstand drawers don't use knobs to open them, but come on how cute are they?!


DIY Frame Corkboard

This is probably my favorite garage sale find of the summer. I was perusing at this older couple's house, and there was this man there who was low balling everything at their sale. He had a HUGE pile of stuff he was basically taking for free. I hadn't noticed the frame for some reason, but I heard him trying to barter them doing from $20 to $5 (ugh ya right??) I was curious what he was bartering for so I turned around and my heart started pounding. I knew I had to have it. So I  pipped up and said "5 dollars?!?! I will give you 10!!" And they went for it MuaHaha!! He was not pleased with me, but a girls gotta do what a girls gotta do. 

I was originally going to turn this into a chalkboard... but I already have so many chalkboards and I wanted to try something new.... 


WHAT YOU'LL NEED:
-old frame
-chalk paint or spray paint
-spray adhesive
-roll of cork
-old table cloth or fabric
-gorilla glue


I used a 50% off coupon at Michael's and got this small jar for like $7. Perfect Color!

It was my first time using a spray adhesive so I just got an all-purpose one I can use for future projects

Gorilla Glue... where would my life be without you??

Surprise!! you can actually buy a ROLL of cork at your hardware store, I picked mine up at Rona. It was the perfect size.


Step 1:
Paint your frame - I'm usually a big time spray painter but I couldn't find a color I liked in Rustoleum's options. I refuse to use Krylon, it is the WORST for drips!!! I sprayed it first but it wasn't the right color - so I opted for chalk paint. I ended up distressing mine a bit too so the embellishments on the frame were more prominent.

Step 2:
I rolled out my cork onto the original canvas from the picture frame, then I gorilla glued the heck outta that beast and let it dry for ~30 minutes. The cork was a little difficult to work with because it wouldn't lay very flat from being so rolled up and if you're not careful it can crack or rip if you man handle it. I had to stack quite a few heavy books on the edges while the glue dried.

Step 3:
I sprayed the adhesive on top of the cork and let it dry for a few minutes so it wasn't super super sticky - that way I could still pull and tug the lace around to center the pattern. Then I put some gorilla glue on the edges of the frame and laid it on top and snapped it into place. Cut off the excess lace/or fabric and you're done!! Easy Peasy.


Now I just need to find the perfect place for it in our room. I'm redoing our master bedroom so stay tuned for some more huge makeovers, my house needs a serious face lift!


THE best cupcake frosting


Cupcakes are one of my favorite desserts. They are a perfect sized treat and you can make them super seasonally cute so easily with cupcake liners, colored frosting, candies, sprinkles, you name it. Check out these thanksgiving cupcakes from this weekend! Depending on how much time I have I will make the actual cupcakes from scratch or from a cake mix. The frosting is what really matters here people!

#1 Cupcake Frosting
1 batch can frost 12-16 cupcakes depending on how tall you make your frosting

1/2 cup margarine
1/2 cup butter
4 cup icing sugar
1 tsp vanilla
1/2 tsp coconut extract 
1 tsp stabilizer
2-4 Tbsp milk --> to make frosting a little smoother

*I like the margarine and butter slightly colder than room temperature. I whip all the ingredients together in my bosch for ~5 minutes, which usually softens up the butter and margarine quite a bit, and you don't want melty frosting!

*The coconut extract is the secret ingredient. I promise it doesn't make the frosting taste like coconut, just gives it a little something special. 

*The stabilizer helps the frosting keep its shape once you've swirled it onto the cupcake. I like Wilton Meringue Powder, I get it at Michael's :)

Tools
You can find all of these at Michael's

Wilton 1M Star Tip


I bought the one on the right, the large tip coupler. It is what attaches your 1M star tip to the bag

I like the big bags because you can put a LOT of frosting in there and you don't have to keep filling up the bag. I actually wash and reuse mine as well, to cut costs :)


Stencilled End Table

Here is another one of those classic pictures everyone pins on Pinterest. You know why we all pin them? Because they are ridiculously cute. I'm pretty sure every single one of my friends has this pinned. We all love stenciling but have no clue how to do it. Let's be real people, most of us can't afford those $50 stencils from Michaels. So I made my own stencil with vinyl!

PINTEREST:

MINE:
cost
table: $5.00 at a garage sale
paint: free - some extra lying around
vinyl: free


Step 1 - This table isn't real wood so I didn't bother sanding or priming. I used a 2 in 1 paint + primer and did 2 coats. Make sure the table is 100% dry before putting vinyl on, or else it will peel off some of the paint when you remove it!!

Step 2 - I printed off a vinyl design and peeled out the areas I wanted to be white. I placed the vinyl on the
table then used spray paint to spray the top of the table

Step 3 - I waited until the white was completely dry then carefully peeled off the vinyl

Step 4 - I used a spray polycrylic for the top of the table for some protection


Key Hook Knock Off

Ok you guys... I am a Pinterest addict. Go ahead... take a look at my Pinterest, I dare you. I also love to stash things in my garage. I'm surprised my husband is still supporting my hoarding. But I know I will find a way to use it all SOMEHOW... so anyways.. I saw this adorable key holder on Pinterest and I knew I could do it, and the beauty of it you guys is that you can do it too.

PINTEREST:

MINE:
When I re-did my bathroom I had to take down my cute his/hers shower hooks a friend gave me for my wedding. It was a sad day. I knew I needed to use them somehow. They are too cute to not be hanging somewhere! I bought these 3 cute flower drawer knobs at Tai Pan Trading in the US. I think they were $3.00 each.
I used some spray paint I had lying around and sprayed just the flower hooks.

We desperately needed somewhere to hang our coats, hoodies, purses etc. (ok ok... so more like I needed somewhere to hang all of my crap that's normally lying around...) So voila! Way cuter in person